![](https://saishono.blog/wp-content/uploads/2022/09/add82658dd7f31abe94b11483c43e16b-150x150.png)
VSCodeの拡張機能、初心者向けのおすすめを知りたい…
以前、コードエディタの記事を書きましたが、Visual Studio Code(VSCode)は拡張機能で環境を作る、といわれても目がテンになりますよね。
そこで今回は、僕が実際に使ってみた初心者向けのおすすめ拡張機能について解説していきます。
▼VSCodeの初期設定と使い方
この記事を書いた人
![](https://saishono.blog/wp-content/uploads/2024/09/writerprofile20240906_2-900x243.png)
当ブログの信頼性・成長記録(開く)
【2023年2月5日】
過去28日間でGoogle検索における当ブログへのクリック数が6K(6000)クリックに到達しました。
![](https://saishono.blog/wp-content/uploads/2023/02/click6k_web-730x900.png)
- Visual Studio Code(VSCode)の初心者が入れておきたい拡張機能5選
- Visual Studio Code(VSCode)のコードを画面内で折り返す方法
VSCodeの日本語化について
Visual Studio Code(VSCode)は日本語化を拡張機能で行います。
拡張機能のインストールや日本語化の方法については、上記の記事をご覧いただければと思います。
(日本語化の拡張機能は今回の5選に入れていません)
Visual Studio Code(VSCode)拡張機能おすすめ5選
Visual Studio Code(VSCode)の初心者向けおすすめ拡張機能は、次のとおりです。
分野 | 拡張機能名 |
---|---|
入力補完 | Auto Close Tag |
入力補完 | Auto Rename Tag |
入力補完 | HTML CSS Support |
入力補完 | Path Autocomplete (またはPath Intellisense) |
スペルチェック | Code Spell Checker |
5つのうち4つが入力補完の機能になります。
ユーザーが先頭の数文字を入力すると、つづく文字を推測して候補を一覧表示し、選択できるようにする機能。
![](https://saishono.blog/wp-content/uploads/2022/09/add82658dd7f31abe94b11483c43e16b-150x150.png)
コードの入力ミスしたら、見つけるの大変そう…
![](https://saishono.blog/wp-content/uploads/2022/09/aefc0e11e6a13a7d3527632034372bc6-150x150.png)
入力補完でミスをなくします
1つずつ見ていきますね。
Auto Close Tag
![](https://saishono.blog/wp-content/uploads/2022/03/20220316-1-900x166.png)
Auto Close Tagは、HTMLの開きタグ( <p> や <div> など)を入力すると、閉じタグ(</p> や </div> など)を自動で入力します。
閉じタグの入力忘れをサポートしてくれます。
▼HTML閉じタグ入力補完の違い
Auto Rename Tag
![](https://saishono.blog/wp-content/uploads/2022/03/20220316-2-900x166.png)
Auto Rename Tagは、HTMLの開きタグと閉じタグの名前を同時に変更してくれます。
たとえば、開きタグを <p> から <div> に変更すると、閉じタグも自動で </p> から </div> に変更されます。
Auto Close TagとAuto Rename Tagをセットで使えば、HTMLの開きタグ・閉じタグの入力ミスや変更ミスを防げますね。
HTML CSS Support
![](https://saishono.blog/wp-content/uploads/2022/03/20220316-3-900x166.png)
HTML CSS Supportは、HTMLを書くとき、CSSで作ったClass名やID名が入力候補に出てきます。
Class名やID名の入力ミスをサポートしてくれます。
Path Autocomplete(またはPath Intellisense)
![](https://saishono.blog/wp-content/uploads/2022/03/20220316-4-900x166.png)
![](https://saishono.blog/wp-content/uploads/2022/03/20220316-6-900x166.png)
コード内でファイル等のパスを正しく入力するのは、手間がかかりますよね。
Path Autocompleteは、ファイル等のパスを入力候補に出してくれます。
同様の機能をもつPath Intellisenseを使っている方も多いようです。
![](https://saishono.blog/wp-content/uploads/2022/09/aefc0e11e6a13a7d3527632034372bc6-150x150.png)
どちらでもOK
Code Spell Checker
![](https://saishono.blog/wp-content/uploads/2022/03/20220316-5-900x166.png)
Code Spell Checkerは、コードの中の変数名やメソッド名のスペルをチェックしてくれます。
プログラムが動かず悩んだ挙句、スペルミスだった…という事態を防いでくれます。
コードを見やすくする初期設定
![](https://saishono.blog/wp-content/uploads/2022/03/20220316-8-900x268.png)
上の画像のようにコードが画面からはみ出してしまうこと、ありますよね。
コードを折り返して画面内で収まるようにする設定方法があります。
これはVisual Studio Code(VSCode)の基本機能にあるので、拡張機能のインストールは不要です。
つづいて、設定方法です。
![](https://saishono.blog/wp-content/uploads/2022/03/20220316-9-900x473.jpg)
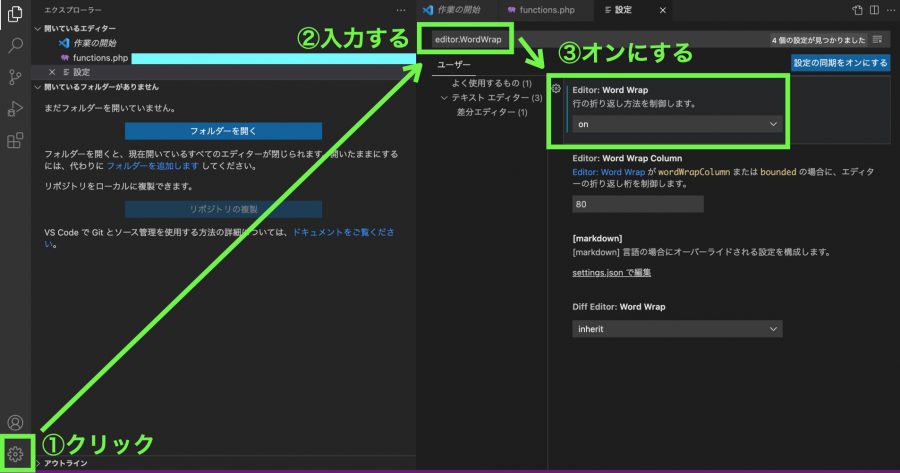
①VSCodeの画面左下の歯車マーク(設定)をクリックします。
②画面上部に検索ボックスが出てきます。「editor.WordWrap」と入力します。
③「Editor:Word Wrap」という項目が出てくるので、オンにします。
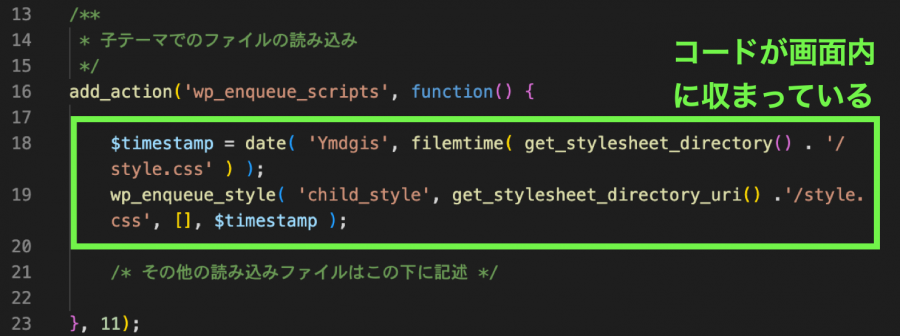
![](https://saishono.blog/wp-content/uploads/2022/03/20220316-10-900x336.png)
コードが画面内に収まりました。
![](https://saishono.blog/wp-content/uploads/2022/09/aefc0e11e6a13a7d3527632034372bc6-150x150.png)
見やすいですね
![](https://saishono.blog/wp-content/uploads/2022/01/20220123-1-450x225.jpg)